> ## Documentation Index
> Fetch the complete documentation index at: https://dripart-context-windows.mintlify.site/llms.txt
> Use this file to discover all available pages before exploring further.
# ComfyUI Flux Kontext Dev 原生工作流示例
> ComfyUI Flux Kontext Dev 原生工作流示例。
## 关于 FLUX.1 Kontext Dev
FLUX.1 Kontext 是 Black Forest Labs 推出的突破性多模态图像编辑模型,支持文本和图像同时输入,能够智能理解图像上下文并执行精确编辑。其开发版是一个拥有 120 亿参数的开源扩散变压器模型,具有出色的上下文理解能力和角色一致性保持,即使经过多次迭代编辑,也能确保人物特征、构图布局等关键元素保持稳定。
与 FLUX.1 Kontext 套件具备相同的核心能力:
角色一致性:在多个场景和环境中保留图像的独特元素,例如图片中的参考角色或物体。
局部编辑:对图像中的特定元素进行有针对性的修改,而不影响其他部分。
风格参考:根据文本提示,在保留参考图像独特风格的同时生成新颖场景。
交互速度:图像生成和编辑的延迟极小。
虽然之前发布的 API 版本提供了最高的保真度和速度,但 FLUX.1 Kontext \[Dev] 完全在本地机器上运行,为希望进行实验的开发者、研究人员和高级用户提供了无与伦比的灵活性。
### 版本说明
* **\[FLUX.1 Kontext \[pro]** - 商业版本,专注快速迭代编辑
* **FLUX.1 Kontext \[max]** - 实验版本,更强的提示遵循能力
* **FLUX.1 Kontext \[dev]** - 开源版本(本教程使用),12B参数,主要用于研究
目前在 ComfyUI 中,你可以使用所有的这些版本,其中 [Pro 及 Max 版本](/zh-CN/tutorials/api-nodes/black-forest-labs/flux-1-kontext) 可以通过 API 节点来进行调用,而 Dev 版本开源版本请参考本篇指南中的说明。
## 工作流说明
目前在本篇教程中,我们涉及了两类工作流,本质上他们其实是相同的,
* 使用了组节点 **FLUX.1 Kontext Image Edit** 的工作流,使得整个界面和工作流复用起来变得简单
* 而另一个工作流没有使用组节点,是完整的原始工作流。
使用组节点的主要优点是工作流简洁,你可以复用组节点来实现复杂的工作流,快速复用节点组,另外在新版本的前端中,我们也为 Flux.1 Kontext Dev 增加了一个快速添加组节点的功能:
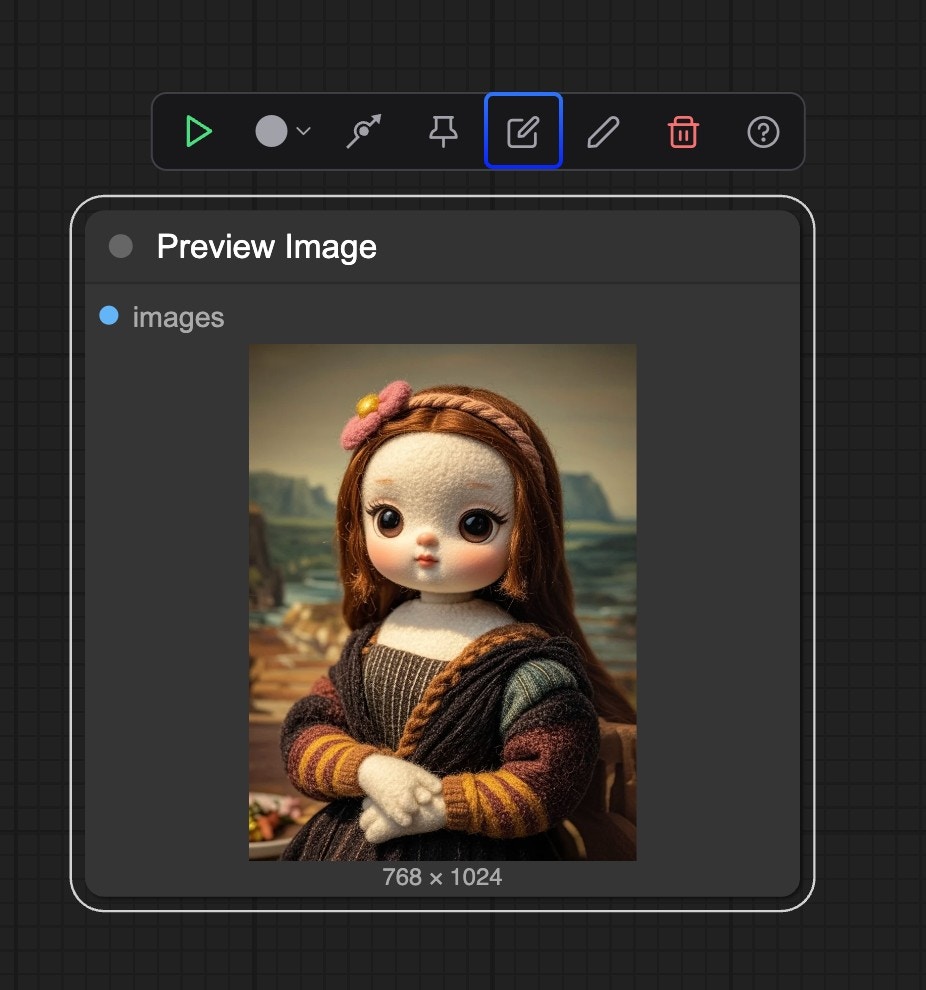 这个功能目前只是一个实验性的新功能,可能在未来版本中进行调整。
请确保你的 ComfyUI 已经更新。
* [ComfyUI 下载](https://www.comfy.org/download)
* [ComfyUI 更新教程](/zh-CN/installation/update_comfyui)
本指南里的工作流可以在 ComfyUI 的[工作流模板](/zh-CN/interface/features/template)中找到。如果找不到,可能是 ComfyUI 没有更新。
如果加载工作流时有节点缺失,可能原因有:
1. 你用的不是最新开发版(nightly)。
2. 你用的是稳定版或桌面版(没有包含最新的更新)。
3. 启动时有些节点导入失败。
## 模型下载
为了使本篇指南的工作流能够顺利运行,你先需要下载下面的模型文件,你也可以直接加载对应工作流下直接获取模型的下载链接,对应的工作流已经包含了模型文件的下载信息。
**Diffusion Model**
* [flux1-dev-kontext\_fp8\_scaled.safetensors](https://huggingface.co/Comfy-Org/flux1-kontext-dev_ComfyUI/resolve/main/split_files/diffusion_models/flux1-dev-kontext_fp8_scaled.safetensors)
如果你想要使用原始权重,可以访问 Black Forest Labs 的相关仓库获取原始模型权重进行使用。
**VAE**
* [ae.safetensors](https://huggingface.co/Comfy-Org/Lumina_Image_2.0_Repackaged/blob/main/split_files/vae/ae.safetensors)
**Text Encoder**
* [clip\_l.safetensors](https://huggingface.co/comfyanonymous/flux_text_encoders/blob/main/clip_l.safetensors)
* [t5xxl\_fp16.safetensors](https://huggingface.co/comfyanonymous/flux_text_encoders/resolve/main/t5xxl_fp16.safetensors) 或 [t5xxl\_fp8\_e4m3fn\_scaled.safetensors](https://huggingface.co/comfyanonymous/flux_text_encoders/resolve/main/t5xxl_fp8_e4m3fn_scaled.safetensors)
模型保存位置
```
📂 ComfyUI/
├── 📂 models/
│ ├── 📂 diffusion_models/
│ │ └── flux1-dev-kontext_fp8_scaled.safetensors
│ ├── 📂 vae/
│ │ └── ae.safetensor
│ └── 📂 text_encoders/
│ ├── clip_l.safetensors
│ └── t5xxl_fp16.safetensors 或者 t5xxl_fp8_e4m3fn_scaled.safetensors
```
## Flux.1 Kontext Dev 工作流
这个工作流是正常的工作流,不过使用了 `Load Image(from output)` 节点来加载需要编辑的图像可以让你更方便地获取到编辑后的图像,从而进行多轮次编辑
### 1. 工作流及输入图片下载
下载下面的文件,并拖入 ComfyUI 中加载对应工作流

**输入图片**

### 2. 按步骤完成工作流的运行
这个功能目前只是一个实验性的新功能,可能在未来版本中进行调整。
请确保你的 ComfyUI 已经更新。
* [ComfyUI 下载](https://www.comfy.org/download)
* [ComfyUI 更新教程](/zh-CN/installation/update_comfyui)
本指南里的工作流可以在 ComfyUI 的[工作流模板](/zh-CN/interface/features/template)中找到。如果找不到,可能是 ComfyUI 没有更新。
如果加载工作流时有节点缺失,可能原因有:
1. 你用的不是最新开发版(nightly)。
2. 你用的是稳定版或桌面版(没有包含最新的更新)。
3. 启动时有些节点导入失败。
## 模型下载
为了使本篇指南的工作流能够顺利运行,你先需要下载下面的模型文件,你也可以直接加载对应工作流下直接获取模型的下载链接,对应的工作流已经包含了模型文件的下载信息。
**Diffusion Model**
* [flux1-dev-kontext\_fp8\_scaled.safetensors](https://huggingface.co/Comfy-Org/flux1-kontext-dev_ComfyUI/resolve/main/split_files/diffusion_models/flux1-dev-kontext_fp8_scaled.safetensors)
如果你想要使用原始权重,可以访问 Black Forest Labs 的相关仓库获取原始模型权重进行使用。
**VAE**
* [ae.safetensors](https://huggingface.co/Comfy-Org/Lumina_Image_2.0_Repackaged/blob/main/split_files/vae/ae.safetensors)
**Text Encoder**
* [clip\_l.safetensors](https://huggingface.co/comfyanonymous/flux_text_encoders/blob/main/clip_l.safetensors)
* [t5xxl\_fp16.safetensors](https://huggingface.co/comfyanonymous/flux_text_encoders/resolve/main/t5xxl_fp16.safetensors) 或 [t5xxl\_fp8\_e4m3fn\_scaled.safetensors](https://huggingface.co/comfyanonymous/flux_text_encoders/resolve/main/t5xxl_fp8_e4m3fn_scaled.safetensors)
模型保存位置
```
📂 ComfyUI/
├── 📂 models/
│ ├── 📂 diffusion_models/
│ │ └── flux1-dev-kontext_fp8_scaled.safetensors
│ ├── 📂 vae/
│ │ └── ae.safetensor
│ └── 📂 text_encoders/
│ ├── clip_l.safetensors
│ └── t5xxl_fp16.safetensors 或者 t5xxl_fp8_e4m3fn_scaled.safetensors
```
## Flux.1 Kontext Dev 工作流
这个工作流是正常的工作流,不过使用了 `Load Image(from output)` 节点来加载需要编辑的图像可以让你更方便地获取到编辑后的图像,从而进行多轮次编辑
### 1. 工作流及输入图片下载
下载下面的文件,并拖入 ComfyUI 中加载对应工作流

**输入图片**

### 2. 按步骤完成工作流的运行
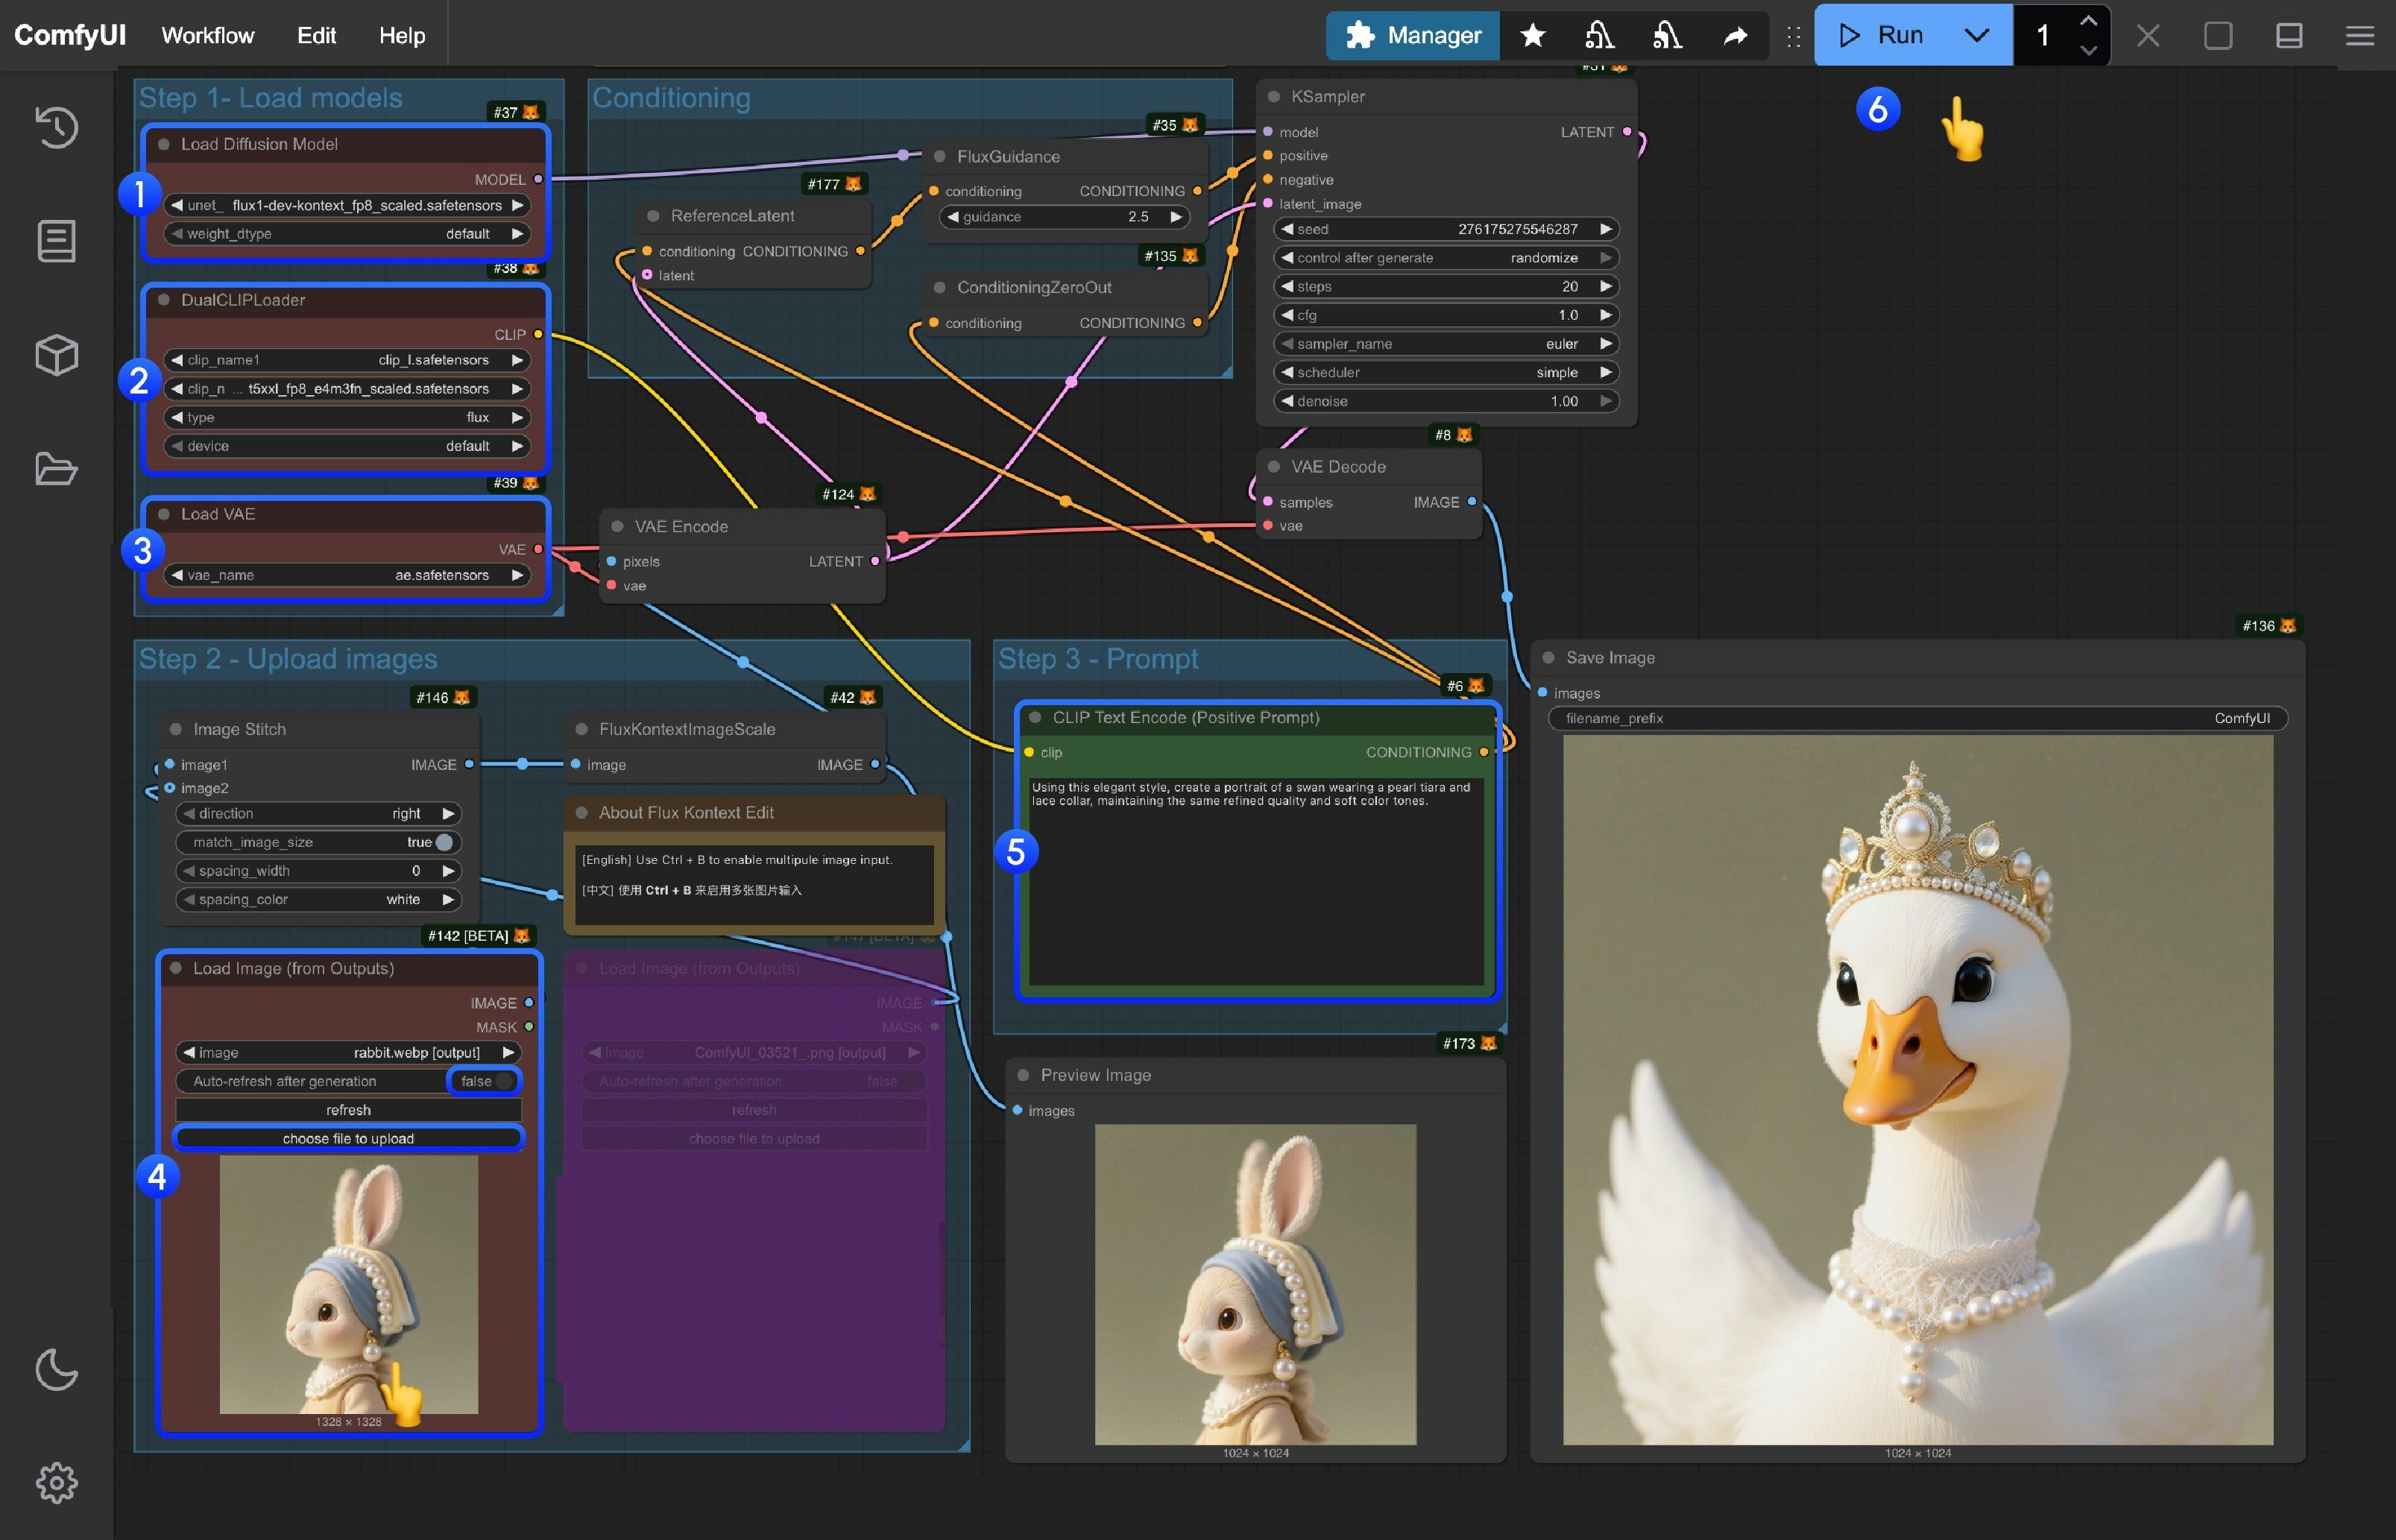 你可参考图片中的序号来完成图工作流的运行:
1. 在 `Load Diffusion Model` 节点中加载 `flux1-dev-kontext_fp8_scaled.safetensors` 模型
2. 在 `DualCLIP Load` 节点中确保: `clip_l.safetensors` 及 `t5xxl_fp16.safetensors` 或 `t5xxl_fp8_e4m3fn_scaled.safetensors` 已经加载
3. 在 `Load VAE` 节点中确保加载 `ae.safetensors` 模型
4. 在 `Load Image(from output)` 节点中加载提供的输入图像
5. 在 `CLIP Text Encode` 节点中修改提示词,仅支持英文
6. 点击 `Queue` 按钮,或者使用快捷键 `Ctrl(cmd) + Enter(回车)` 来运行工作流
## Flux Kontext 提示词技巧
### 1. 基础修改
* 简单直接:`"Change the car color to red"`
* 保持风格:`"Change to daytime while maintaining the same style of the painting"`
### 2. 风格转换
**原则:**
* 明确命名风格:`"Transform to Bauhaus art style"`
* 描述特征:`"Transform to oil painting with visible brushstrokes, thick paint texture"`
* 保留构图:`"Change to Bauhaus style while maintaining the original composition"`
### 3. 角色一致性
**框架:**
* 具体描述:`"The woman with short black hair"`而非`"she"`
* 保留特征:`"while maintaining the same facial features, hairstyle, and expression"`
* 分步修改:先改背景,再改动作
### 4. 文本编辑
* 使用引号:`"Replace 'joy' with 'BFL'"`
* 保持格式:`"Replace text while maintaining the same font style"`
## 常见问题解决
### 角色变化过大
❌ 错误:`"Transform the person into a Viking"`
✅ 正确:`"Change the clothes to be a viking warrior while preserving facial features"`
### 构图位置改变
❌ 错误:`"Put him on a beach"`
✅ 正确:`"Change the background to a beach while keeping the person in the exact same position, scale, and pose"`
### 风格应用不准确
❌ 错误:`"Make it a sketch"`
✅ 正确:`"Convert to pencil sketch with natural graphite lines, cross-hatching, and visible paper texture"`
## 核心原则
1. **具体明确** - 使用精确描述,避免模糊词汇
2. **分步编辑** - 复杂修改分为多个简单步骤
3. **明确保留** - 说明哪些要保持不变
4. **动词选择** - 用"change"、"replace"而非"transform"
## 最佳实践模板
**对象修改:**
`"Change [object] to [new state], keep [content to preserve] unchanged"`
**风格转换:**
`"Transform to [specific style], while maintaining [composition/character/other] unchanged"`
**背景替换:**
`"Change the background to [new background], keep the subject in the exact same position and pose"`
**文本编辑:**
`"Replace '[original text]' with '[new text]', maintain the same font style"`
> **记住:** 越具体越好,Kontext 擅长理解详细指令并保持一致性。
你可参考图片中的序号来完成图工作流的运行:
1. 在 `Load Diffusion Model` 节点中加载 `flux1-dev-kontext_fp8_scaled.safetensors` 模型
2. 在 `DualCLIP Load` 节点中确保: `clip_l.safetensors` 及 `t5xxl_fp16.safetensors` 或 `t5xxl_fp8_e4m3fn_scaled.safetensors` 已经加载
3. 在 `Load VAE` 节点中确保加载 `ae.safetensors` 模型
4. 在 `Load Image(from output)` 节点中加载提供的输入图像
5. 在 `CLIP Text Encode` 节点中修改提示词,仅支持英文
6. 点击 `Queue` 按钮,或者使用快捷键 `Ctrl(cmd) + Enter(回车)` 来运行工作流
## Flux Kontext 提示词技巧
### 1. 基础修改
* 简单直接:`"Change the car color to red"`
* 保持风格:`"Change to daytime while maintaining the same style of the painting"`
### 2. 风格转换
**原则:**
* 明确命名风格:`"Transform to Bauhaus art style"`
* 描述特征:`"Transform to oil painting with visible brushstrokes, thick paint texture"`
* 保留构图:`"Change to Bauhaus style while maintaining the original composition"`
### 3. 角色一致性
**框架:**
* 具体描述:`"The woman with short black hair"`而非`"she"`
* 保留特征:`"while maintaining the same facial features, hairstyle, and expression"`
* 分步修改:先改背景,再改动作
### 4. 文本编辑
* 使用引号:`"Replace 'joy' with 'BFL'"`
* 保持格式:`"Replace text while maintaining the same font style"`
## 常见问题解决
### 角色变化过大
❌ 错误:`"Transform the person into a Viking"`
✅ 正确:`"Change the clothes to be a viking warrior while preserving facial features"`
### 构图位置改变
❌ 错误:`"Put him on a beach"`
✅ 正确:`"Change the background to a beach while keeping the person in the exact same position, scale, and pose"`
### 风格应用不准确
❌ 错误:`"Make it a sketch"`
✅ 正确:`"Convert to pencil sketch with natural graphite lines, cross-hatching, and visible paper texture"`
## 核心原则
1. **具体明确** - 使用精确描述,避免模糊词汇
2. **分步编辑** - 复杂修改分为多个简单步骤
3. **明确保留** - 说明哪些要保持不变
4. **动词选择** - 用"change"、"replace"而非"transform"
## 最佳实践模板
**对象修改:**
`"Change [object] to [new state], keep [content to preserve] unchanged"`
**风格转换:**
`"Transform to [specific style], while maintaining [composition/character/other] unchanged"`
**背景替换:**
`"Change the background to [new background], keep the subject in the exact same position and pose"`
**文本编辑:**
`"Replace '[original text]' with '[new text]', maintain the same font style"`
> **记住:** 越具体越好,Kontext 擅长理解详细指令并保持一致性。